The key to decorating for me is two fold- CHEAP and EASY. This DIY is both of those!
Just a few items are needed:
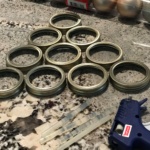
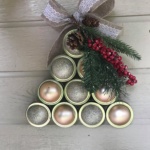
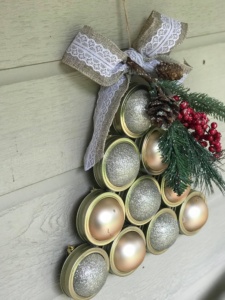
- Canning rings- recycled ones are best. If not, you can find them at a local discount store. Mine were are $2.18 for 12. You’ll need 10.
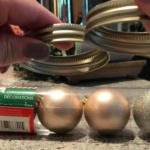
- Ornaments- I went with the plastic ones from the Dollar Tree. There are 7 in a sleeve. You’ll need 2 sleeves. $2.00
- Twine for hanging- I had this on hand. However, it’s also available at the Dollar Tree.
- Greenery- Dollar Tree. $1.
- Wired Ribbon (Burlap/lace style for me)- Dollar Tree for the win again. $1.
- Glue gun and glue- Again, I keep this on hand but you can find this at discount stores and possible the Dollar Tree.
So, my cost for this cute Christmas Tree for my door and entry was just around $6!
It will take you about 10 minutes to assemble.
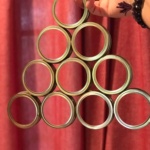
- Lay rings out to form a tree design.
- Hot glue rings together, taking precautions to not burn your precious fingers. Make sure once you glue each of them, that you lay them down, and press down to ensure they lay flat. Nobody wants a caddy-wompass tree. JS
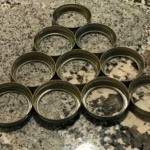
- Now, turn your tree rings over to where the rings form a cup for the balls to lay in. Play your ornaments in to form a pattern that makes your heart happy. My ornaments are satin and gold glittered. You could even use multiple colors. What makes you smile? Use that.
- You’ll want to prop your tree up slightly so that the balls can lay flat when you start gluing. You’ll see what I’m talking about with the next step.
- Start gluing the ornaments in. I found that a big dollop on the side of each ornament works when pressed in the ring. Make sure you are not getting glue all in the front facing part of the tree. Turn the ornament around as necessary to hide the yuck of glue. Once they are set in, you may want to squeeze in more glue on the other side of the ornament to help hold it in place- on the back side of course.
- Make a bow.
- Add the greenery.
- Tie the bow/greenery to the top of your cute tree with a hanger made of twine. Glue if necessary.
- Store your cute ornament tree in a place where you’ll remember it when it comes time to decorate for Christmas. Enjoy!
Have you enjoyed this easy Christmas DIY? Share it!